Showing posts with label Mobile News. Show all posts

13 Android tips and tricks you probably didn't know about

13 Android tips and tricks you probably didn't know about
 
Android is a great little operating system. It’s absolutely packed with great features, awesome hacks, and time-saving tricks.
But how much do you really know about your phone or tablet?

Sure, you can make phone calls and send texts, but we bet there is something in this article that you weren’t aware of.

Read on to find out!

1) Enable Developer Mode
Ok, this is one of the more widely known tricks, but it’s important nonetheless, so we are going to include it..

Navigate to Settings > About phone and tap on your phone’s build number seven times. You’ll get an onscreen countdown, eventually followed by a message saying “Congratulations, you are now a developer”.

2) Change the Animation Scales

For the most part, the latest Android phones already feel very snappy. However, after the latest Nexus 5X only shipped with 2GB of RAM, some users were left feeling a bit underwhelmed by Google’s hugely popular product line.

There are also lots of popular entry-level phones that come with slower processors and only 1GB or 2GB of RAM.

One solution is to change your phone’s “Window animation scale”, “Transition animation scale” and “Animator duration scale” from 1x to 0.5x. Granted, it won’t actually make your phone faster, but it will make it feel faster.

Go to Settings > Developer options and scroll about two thirds of the way down the list to find the necessary options (you’ll need to have first enabled Developer Mode).

3) Clear App Defaults
It’s annoying when a link opens in a certain app rather than in the browser. It could be a YouTube link, a tweet, or a Facebook page — you’ll end up waiting around while your phone shuts down Chrome (or your browser of choice) and fires up something else.

It’s easily fixed.

Go to Settings > Apps and find the app that keeps opening. Once there, scroll down to Open by default, press it, and then select Clear Defaults.

If that doesn’t work, try doing the same with your browser app as well.

4) Quickly Change Your WiFi Network

Oddly, how to quickly switch between WiFi networks is not very obvious. Sure, you can go to Settings > Wi-Fi and change it there, but there has to be a faster way, right?

Swipe down twice from the top of your screen to open the Quick Settings menu, and instead of pressing on the WiFi icon (which disables it), instead press on the network’s name. You’ll immediately be given a list of all the networks in your vicinity.

That is, if your version of Android supports this.

5) Quickly Access the Quick Settings Menu

Speaking of the Quick Settings menu, did you know you don’t actually need to double swipe in order to  access it?

Instead, a simultaneous two-finger swipe will have the same effect.

6) Cast Your Screen
Are you a Chromecast owner?


If so, you can easily mirror your Android’s screen (and individual apps) by using the cast function.

Just open the Quick Settings menu and hit Cast. Your device will find your Chromecast (assuming it’s on the same local network), and you’re good to go.

It’s great for playing games on a larger screen, showing off photos to family and friends, or playing your music through a louder set of speakers. Though many apps, like YouTube, have a dedicated cast button within the app.

7) Locate Annoying Notifications

Do you keep getting an annoying app notification, but you’re not sure which app is causing it?

There is an easy solution — just long-press on the notification in question, and your device will tell you.

8) Manage App Notifications
Moving on one step further from the previous tip, after you’ve long-pressed the app you’ll see an information icon. Press it, and you’ll be presented with the notification settings for the app in question.

You can do things like block all its notifications, allow it to override priority mode, and make it hide private information.

9) Priority Mode

Priority mode is probably one of the most underrated and underused features on the entire operating system.

In short, it allows you to put your phone into quiet mode, but still allow some “noises” to get through. This could be calls, texts, or WhatsApps from specific contacts, notifications from certain apps, or important alerts such as alarms.

To set it up, go to Settings > Sound & Notification > Do not disturb, then select the options that you require.

It can be quickly toggled on and off from the Quick Settings menu.

10) Map Zoom
Ever need to use Google Maps one-handed? (No, not while you’re driving!)

Just double tap the screen and swipe up and down to zoom in and out — it’s a lot less fiddly than trying to pinch your fingers and hold your phone at the same time!

11) Smart Lock
Smart lock is super useful. It removes the need to use a keypad lock when you’re at home or in another “trusted” environment.

It can use GPS, certain networks, your face, or even your voice to prevent your phone from locking itself, making for a much faster and hassle-free experience.

Head to Settings > Security > Smart lock to set it up.

12) Screen Pinning

If you have kids using your phone regularly, this is a great way to make sure they don’t accident run up huge bills or set their eyes on content that is age-inappropriate.

Firstly, you’ll need to enable the feature (oddly, it is turned off by default). Do that by going to Settings > Security and scrolling down to Screen pinning.

To pin a screen, open the app, press the Overview button (the square) and then the pin icon.

You can choose to PIN-protect the pinned screen, if you so wish.

13) Secret Game

Another well-known Android Easter egg among old-timers, the secret game might not be so obvious to newcomers.
Lollipop and Marshmallow’s game is based on Flappy Bird; it has the same gameplay principle but has had an Android-themed makeover graphics-wise.

Head to Settings > About phone and tap the device’s version number several times. Eventually you’ll be presented with an on-screen lollipop or marshmallow depending on your operating system. Continue to rapidly tap the center of it and the game will launch.

Your Tips?
What tips and tricks can you pass on to your fellow Android users?

Let us know your best ones in the comments section below!

Samsung Galaxy S10 may have iPhone X-like facial recognition


Samsung unveiled its flagship Galaxy S9 series at MWC 2018. It has been not even a month, and rumors about the Galaxy S10 have started surfacing. The Korea Herald reports that Samsung's 2019 flagship will come with a more advanced facial recognition technology. According to the publication, the smartphone could feature a 3D sensing camera module similar to that used by iPhone X.

Samsung has apparently approached an Israeli startup Mantis Vision to develop a 3D sensing camera module. Mantis Vision along with camera module firm Namuga, will create advanced hardware and software mix for the Galaxy S10. For those who are not aware, Namuga is already working with the South Korean tech giant to supply camera modules for its mid-range and entry-level handsets. Stay tuned to GizBot for more updates!

Samsung made fun of iPhone X's Face ID Unless you are living under a rock, you must know the rivalry between Samsung and Apple. The companies never let of a chance to mock each other. During the Galaxy S9/S9+ unveil event at MWC 2018, Samsung said that the fingerprint scanner is one of the most popular ways of unlocking our phones, and this is why it didn't get rid of the fingerprint scanner. Well, Samsung very subtly mocked Apple for ditching the fingerprint scanner in favor of the Face ID.

Will Samsung ditch the fingerprint scanner? It is too early to answer this question, but we don't think so. Even if Samsung manages to incorporate a highly advanced facial scanning feature into the Galaxy S10, it will probably still want to leave an alternative for the users to be on the safe side. Moreover, the company's statement at MWC 2018 also suggests that it won't ditch the fingerprint scanner anytime soon.

Galaxy S10 or Galaxy X? Some reports suggest that Samsung will adopt a new naming scheme for the next-generation models. The Galaxy S10 series is expected to be announced with the moniker Samsung Galaxy X. It makes sense for Samsung to opt for this moniker as it will be an ideal answer to the iPhone X that Apple released last year as the company's tenth-anniversary edition.

Oppo R15 to launch on March 31 with 6.28-inch display, 6GB RAM


Oppo R15 has been making rounds on internet for quite a while now. After several leaks and official teasers, Oppo has announced that the launch date for the smartphone. According to the poster released on Weibo, the R15 will be launched alongside R15 Dream Mirror Edition on March 31 in China.

In a separate poster, it has been revealed that Zhang Yishan, the Chinese actor will be the brand ambassador for the flagship duo. Thanks to the leaks, we already know the specifications of the Oppo R15 and R15 Dream Mirror Edition. Both models will come with similar specifications, but there will be some differences in some aspects. The smartphones will sport a 6.28-inch AMOLED display with a screen resolution of 2,280×1,080 pixels and aspect ratio of 19:9. There will be 6GB RAM and 128GB default storage onboard. The Oppo R15 and R15 Dream Mirror Edition will have almost the same thickness and weight and run Android 8.1 Oreo topped with the company's ColorOS 5.0.


The smartphones will also flaunt a 20MP front camera. Talking about the differences, the R15 will be powered by a MediaTek Helio P60 processor, whereas the R15 Dream Mirror Edition will pack a Qualcomm Snapdragon 660 processor. Both the smartphones will arrive with dual rear cameras, but the sensors will have different resolutions. 

The R15's dual rear camera setup will include a 16MP primary sensor and a 5MP secondary sensor. The R15 Dream Mirror Edition, on the other hand, will feature a 16MP + 20MP camera setup on its back. The differences between the R15 and R15 Plus do not end with the rear camera and processor. It also extends to the battery capacities, color variants and design. The R15 will feature a 3450mAh battery with fast charging support. 

The device will also feature a 2.5D glass back design and arrive in Snow White, Thermal Red, and Starry Violet colors options.

When it comes to the Oppo R15 Dream Mirror Edition, the smartphone is said to feature a smaller 3,400mAh battery with fast charging and a 3D glass back design for the Red color variant and a Ceramic back design for the Black color variant.


How to upload high-quality images on Facebook from your phone

Have you ever found the high-resolution video that you took at your cousin’s wedding replaced by a grainy mess when you upload it to Facebook? This problem might not be something you face if you usually stick to uploading pictures or videos from your Desktop, but if you happen to be using your phone, you will find yourself with a file of a lower resolution being uploaded to your feed. This can happen in both devices equipped with iOS or Android.


Both the official apps by default only lets you upload photos and videos of a lower quality in order to save on bandwidth, the following needs to be done to overcome this:


1)    On devices operating on iOS

iOS 10 provides you with the opportunity to integrate social media apps like Twitter, Facebook, Vimeo and Flickr. But accessing the settings will not allow you toggle between uploading files of lower and higher resolution. In order to get around this issue, you will need to make use the official Facebook mobile app.

The following is what you need to do:

a)    Install the Facebook app.

b)    Launch the Facebook app.

c)    Go to the bottom right corner of the interface.

d)    Tap the More button.

e)    Scroll down and click on Settings.

f)    A sheet asking you to choose between Account Settings, News Feed Preferences and Activity Log pops up.

g)    Click on Account Settings.

h)    Click on Videos and Photos.

i)    Toggle the Upload HD button in the app to ON.

By doing this, the app as well as the phone will default to uploading high-definition videos.

For users on metered cellular plans, exercising caution will serve them well as transferring HD files will take much longer as the files produced are much bigger in size.

Disabling the iOS 9 feature called Wi-Fi Assist which switches to your carrier’s data network if the Wi-Fi connection is poor will be a good thing to do.


2)    On devices operating on Android

Devices operating on Android, unlike iOS devices do not have the option of direct integration with social media. But the official Facebook app for Android is very efficient. By default, the videos and photos uploaded to Facebook will be of a low quality and in order to upload files of a higher resolution, the following needs to be done:

a)    Install the Facebook app.

b)    Launch the Facebook app.

c)    Access the options screen in the top right corner.

d)    Scroll down to Help and Settings.

e)    Select App Settings.

f)    The switches next to Upload Photos in HD and Upload Videos in HD must be toggled on.


How to run the same app in split screen on any Android Oreo phone


Android is full of hidden features. Today we give you a step-by-step guide to run the same app in split screen on any Android Oreo phone 

 Split screen mode is one of the best thing that has ever happend to Android devices. Every Android user dreamt of running two apps simultaneously on one screen to get away from the hassle of switching apps to complete a simple task. Google made it possible with Android Oreo update, which is gradually making its way to every Android device around the globe.

While the feature is immensely useful, it is still not perfect. 


Not all the applications are supported by split screen mode which restrict Android users to utilize the feature completely. 

Besides, it lets users run only a single copy of an app at a given time. If you want the same app to run on different screens using the split screen mode in Android Oreo, you can follow these steps. 

These step-by-step guide will allow you to run the same app in two different screens.  

Step 1: Download and install Parallel Windows on your phone. You need to install it on your Android device from Google Play Store. 

Step 2: Open the app and you will see a lot of permissions appearing on the screen. You need to provide access to the app. You need to check the checkbox that will popup to allow the app to use in PiP mode. Then click on continue. 

Step 3: Now open the app and you will see the list of all the apps on your device. Choose the app you want to run in the split mode and clone the app using the options available. The cloning will save a different copy of the same app in Parallel Windows. 

Step 4: Run any app for which you created a clone in the split screen mode with this app and chose to select the Parallel Windows on the other part of the window. Open the app and select the clone version of the app that you created before. 

Choose the same app on the other part of the screen and that is it. You will be able to run two separate panels of the same app simultaneously.

How to reduce Netflix data usage


Following these steps will let you enjoy Netflix in peace without worrying about exhausting your data pack.

Streaming content, be it visual or auditory, is slowly diminishing other forms of entertainment due to its seamlessness. Netflix is perhaps the most popular among several services that allow you to stream content. Several reasons exist, but it’s widely recognized that Netflix pioneered this across smartphones, web, and the television.

While we relish streaming, few, if not all, are concerned about their data. It’s known that Netflix needs a sturdy internet connection and cranks up the quality based on the speed. It is built that way. To stream high definition content you’ll need to sacrifice data. To some, this doesn’t make a difference, but since most of us work with smaller plans, Netflix has to be used with caution. If you have a plan of 100GB per month, a three hour HD movie streamed on Netflix will devour close to 20GB. Metered connections always face this problem.

To control data flow, you’ll have to learn how to manipulate the video settings. As you understand this, you can do the same across all platforms according to what each one requires. Let’s look at how to control video settings through the web app.

View Netflix on your browser and fill in your login details to access your account.

Once you see the homepage, click on the account icon on the far right. This brings a drop-down menu.
Out of the options available, you’ll see one called 'Account.’ Click on it.

You’ll be redirected to a fresh page where you’ll see several account settings. Go to 'My Profile’ and open 'Playback Settings.’

It lists the options available for video playback. From 'Auto’ to 'High’, it describes the quality of video streaming. The default setting is 'Auto.’ Choose what you’re aiming for and save it.
For mobile phones - The resolution is generally lower than other devices and playing ultra HQ videos is a waste. Therefore, choosing 'Low’ would be apt. This will ensure you don’t consume more than 300MB per hour.

For PCs and Tablets - Bigger screens demand better video quality. 'Medium’ works fine on PCs and tablets and laps up about 700MB per hour. If you aren’t satisfied, you can go for 'High’, which offers the best quality.
See Also :-
Honor 7c launched with 5.99 inch display dual rear cameras
For Televisions - The best of the lot have ultra HD screens and display 4K videos. On these beasts, the only option that boasts of good quality is the 'High’ option. However, be warned that some videos are shot in ultra HD and you may lose up to 7GB an hour. If your TV doesn’t support UHD, then the data consumed won’t surpass 3GB.

Stay tuned to Site for more updates!

Tips and Tricks Stay updated with latest technology news & gadget reviews. Subscribe to Tips and Tricks.


Follow These Simple Steps to Remove Your Number From Truecaller App

Follow These Simple Steps to Remove Your Number From Truecaller App

 Most of us have Truecaller app on our smartphone, which is used to check or identify the caller, spam and much more. For the uninitiated, Truecaller is the app available in most of the mobile platform and desktop as well that shows you the contact details of unknown number calling you.


This app contains a huge database of contact numbers around the world, collected from millions of smartphones around the world. Even, if you didn't have the app, your name and number could be on the Truecallers database. This happens because someone from your circle has stored you in their contact and allowed the app to access them. 


SEE ALSO: Apple in Talks With Foxconn to Manufacture iPhones in India: 

Here's everything you need to know The problem with this app is that it is very intrusive.

 Through this app, and if it is listed, some can even access your address publicly! There are options to remove your number Truecaller database, however, you can't remove your number from the service if you are using the app. 

In order to delete your number, You'll have to deactivate your own account to get your number removed. 

You can remove your number with below steps! 

Deactivate You True caller account! 

Step 1: Open the App 

Step 2: Tap the three horizontal lines on the top left corner of the display 

Step 3: Go to settings -> About 

Step 4: Tap on the 'deactivate' option and press yes 

Remove your number from true caller 

Step 1: Go to the true caller unlist page 

Step 2: Enter your mobile number with country code. For example +91 1234567890. 

Step 3: Select any option for unlisting 

Step 4: Type the words/numbers in the verification box

 Step 5: Click unlist! Click Here for New Smartphones Best Online Deals


How to Block Google from listening to your voice

Here are few ways you can delete the stored data from Google's database.

 It's a known fact that Google follows each and every activity of ours in detail, where the data is stored to improve the experience of the users collectively. In case, if you use the Google's Voice assistant, you can do internet searches, call contacts, take photos, set an alarm, create a calendar event, make a note, and much more the list goes on.


However, each and every command you gave is stored as an audio file in Google's database. Feeling creepy? Don't worry, as there are options to delete those and to turn it off from listening. And exactly that's what today's article is all about.

Turning off Google Voice assistant 


Step 1: First, go to Settings -> Select Google. 

Step 2: Now tap Search under the Services header. 

Step 3: Now select the Voice entry, where you will see an option called Voice Match. 

Step 4: Now, turn off the Say "OK Google" any time switch. 

or 

Step 1: Tap on the Google app and tap on the three horizontal lines in the upper left corner 

Step 2: Tap "Settings." 

Step 3: Select Voice -> Ok Google detection. 

Step 4: Tap the slider next to "Say Ok Google" anytime" to disable the feature.

Stop linking your voice recording to your Google's Account 


Step 1: Now go to Google's Activity Controls page and log into your account. 

Step 2: After that scroll down till you see Voice & Audio Activity. 

Step 3: Now turn off the slider and you'll stop linking your voice recordings to your Google account.

Block Google from using your phone’s microphone 


Step 1: Head on to Settings -> Apps & notifications. 

Step 2: Select "See all apps" to see the apps you have installed on your device 

Step 3: Scroll down, till you see the Google app and select it. 

Step 4: Now tap Permissions and turn off the toggle of the Microphone slider.

Stay tuned to Site for more updates! 


Tips and Tricks Stay updated with latest technology news & gadget reviews. Subscribe to Tips and Tricks.


How to hide images and videos on your iPhone


Showing off the wonderful pictures that you took during your last trip might not be the best experience if you have private content in your gallery that you would rather not have others see.


See Also : Follow These Simple Steps to Remove Your Number From Truecaller App


Apple has developed features that let you hide specific pictures and videos in the Photos app. By using this feature that is available in most iOS devices, you can make sure that the next time you stream your slideshow or let someone browse through your gallery, your private content can remain safe from the gaze of unwelcome eyes. The details of how to use the feature effectively and more information about it has been provided below:

Selecting the content Open the Photos app, locate the photos and videos that you want to hide. If you have only one photo or video, select that one, preview it and then hit the share sheet icon. You can select multiple photos by swiping left and right. You can check all the nearby photos and videos that you wish to hide. You can also hit "Select" from the album view, tap on the photos and videos you want to hide and then hit the share sheet icon.


Hiding the content Once you have all the photos and videos you want to hide in the share sheet menu, you can find the "Hide" button after swiping through the bottom list of activities. After tapping this, you will be able to choose between the following: a)    "Hide Photo" (or "Hide # Photos" for multiples) b)    "Hide Video" (or "Hide # Videos" for multiples) c)    "Hide # Items" (for both photos and videos) You can hide photos and videos right after you capture them by using the Camera app. Just click on the "Photos" shortcut in the Camera app. You can only see the photos you took in that particular session if you just opened your app. If you wish to access all your share sheet, you will need to unlock your iPhone.

Finding hidden content The hidden media will not be available anywhere in the Photos app, they will only be available in the "Hidden" folder available in the "Albums" tab. Even the items taken through third-party apps will not be available but in the album named "Hidden." 


They will be removed from their respective folders and moved to this one. They will not be appearing in the Moments, Years and Collections view from the "Photos" tab, in the "Memories" tab or in the "Camera Roll." If the iCloud Photo Library is enabled, anything you hide on your iPhone will also be hidden on all the other Apple devices that are connected to your Apple ID.


Unhiding your content After accessing the Hidden folder, you can unhide a photo or video by doing the opposite of what you did to hide them. Select the ones you want and tap "Unhide" from the activities row. Stay tuned to site for more updates!

Tipsandtricks Stay updated with latest technology news & gadget reviews. Subscribe to tipsandtricksarroundtheworld

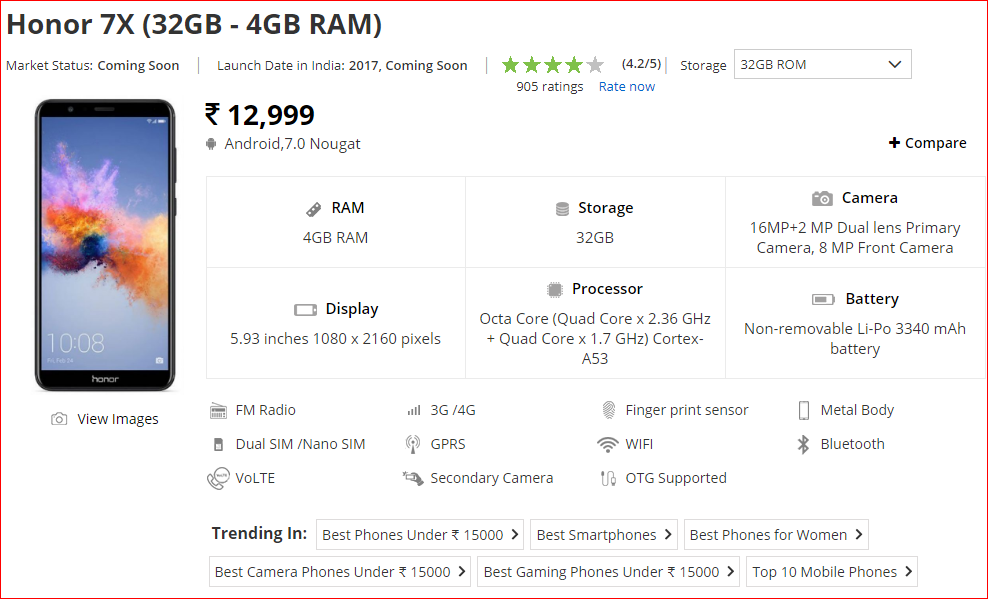
Honor 7X


VARIANTS 
Honor 7X (64GB - 4GB RAM) 13,290 
Honor 7X (128GB - 4GB RAM) 19,999 

HONOR 7X (32GB - 4GB RAM) 

DETAILS

Honor 7X had launched on 7th December, 2017. Feel the max view with the device, featuring 18:9 full display, 16MP dual lens camera, 4GB RAM and 32GB internal storage. 

The elegance lies with the best designed ‘ Easy Transfer ‘ facility, with which you just need to scan a QR code , and all your precious photos, files, data etc will be seamlessly transferred. The other best thing is ‘ One Key Screen Split ‘, offering an even faster multi management experience. On clicking the whatsapp message notification, you can stay up with the latest news. The classic metal design of this phone is a delight to hold, with its perfectly rounded edge. 7X is available in Black, Blue and Gold.  Its differential lies in the quality, ability to innovate and this phone is a result of extensive research and development. Let’s see some other important features. 

DISPLAY 

Feel engulfed with no boundaries. The mobile comes with edge to edge design, with a high screen to body ratio and 2160*1080 FHD+ resolution. The display is packed with a 5.93” screen, that looks incredibly sleek and compact. The 18:9 screen brings more real estate, giving you a wider view than other games.    

PROCESSOR AND STORAGE 

No overlooking, when you got the device as the best to operate fast, with swift performance. Honor runs on lightning fast 2.36GHz octa core kirin 659, and EMUI 5.1. You won’t slow down, even after multiple apps run simultaneously. The phone is packed with 4GB RAM, 64GB internal storage expandable up to 256GB.   

CAMERA 

Feel evergreen with peerless beauty. The smartphone is equipped with dual lens 16MP + 2MP rear camera, that captures life’s magical moments at the highest definition. The new portrait mode allows you to take a professional and artistic picture in a single shot. 

The PDAF with upgraded algorithm, offers ultra fast focus time. The 8MP front camera features an effects function, ensuring your selfies to be engrossing on social media. The new gesture control function, lets with just turning the palm to the camera to trigger a countdown for a selfie. 

CONNECTIVITY 

The connectivity aspects on board includes wi fi 802.11 b/g/n, wi fi direct, hotspot, micro USB v 4.1, and supports LE. The device also features A-GPS, GLONASS, A2DP, EDR and etc. With easy transfer facility, you can smoothly migrate the data. 

BATTERY 

Stay long lasting, with Honor 7X. The big 3300mAh battery, with power saving technology enabled by the 16nm kirin 659 chipset, lets you go more than a day on single charge. The ultra power saving mode extends your charge even longer. 

SOFTWARE 

Get going with tremendous suave. The smartphone is equipped with the best of Google’s certified version firmware- Nougat 7.0. The uninterruption will make you approach towards the least tiresome experience, while operating the device. 

SENSORS 

The smartness lies as fingerprint sensor ensures all photos, files, messages, and documents, accessible only after you touch. This is certainly the safest way to secure your privacy. 

PRICE 

Honor 7X price in India starts from INR 15,999/-, comes as the best available amount. The price ideally looks even the lowest, for right investment at the right place.


Honor 7X gets Face Unlock and AR Lens via a new OTA update

Honor 7X gets Face Unlock and AR Lens via a new OTA update

The Honor 7X smartphone was launched in India back in December last year for Rs, 12,999 and Rs. 15,999. Soon after its launch, it was revealed that the device will get the Face Unlock feature via an update. Later, the Chinese variant of the smartphone received the update. Now, it looks like the update has been rolled out for the units in India too.

The Honor 7X has started receiving a new OTA update measuring 482MB and the changelog shows that the device will get the Idea Cellular VoLTE, Face Unlock feature, and AR Lens feature in the camera. Notably, the company assured that the Face Unlock feature will be rolled out to the Honor 9 Lite and Honor View 10 and these devices received the update recently.

The much-hyped Face Unlock feature was initially rolled out by Apple as a part of the iPhone X and was dubbed Face ID. This facial recognition feature started making its way as the Face Unlock on the Android smartphones since then. Now, we have come across many devices in the budget and mid-range market segment as well having the facial recognition feature. Honor India has taken to Twitter to reveal that the Honor 7X will start receiving the Face Unlock feature. Also, the company has revealed that the device will be available at No Cost EMI and exchange offer on Amazon India. It has also made it clear that the Face Unlock feature will be rolled out to all the users of Honor 7X by March 16. If you own an Honor 7X, you will receive the notification to install the OTA update to get this feature. If not, you can head on to Settings → System Updates and check for the update manually. The Face Unlock feature lets you unlock the smartphone with your face. You can access this facial recognition feature from Settings → Privacy → Face Unlock and look at the front camera. The technology will identify your face and enable the unlocking function, which will work along with the already existing one such as PIN, pattern or fingerprint unlock.

Talking about the AR lens feature in the default camera, you can access it from Camera → Modes → AR Lens. It will let you change the background or add layers to your selfie shots.


Honor View

Honor 7c launched with 5.99 inch display dual rear cameras

As expected, Huawei's sub-brand Honor has launched the Honor 7C in China. Despite being a budget offering, it comes with an impressive set of specifications and features. In terms of design, the smartphone looks sleek with a full-screen display that has an aspect ratio of 18:9. Another significant aspect of the handset is its rear dual camera setup.

The Honor 7C comes in two variants. The regular version with 3GB RAM and 32GB storage costs 899 Yuan (roughly Rs. 9,240). Whereas the higher version with 4GB RAM and 64GB storage carries a price tag of 1,299 Yuan (roughly Rs. 13,350). 

The smartphone will go on sale in China starting from tomorrow. There is no word yet on Honor 7C's global availability. 

Coming to the specifications, the Honor 7C ships with a 5.99-inch TFT LCD IPS display that delivers an HD+ resolution of 1440×720 pixels. 


Under the hood, it is fueled by a 14nm octa-core processor that is clocked at 1.8GHz, with Adreno 506 GPU on top. While the name of the chipset has not been specified, it is most likely be the Qualcomm Snapdragon 450 SoC. As stated, the Honor 7C offers 3GB/4GB RAM of RAM and 32GB/64GB of internal storage depending on the variant. 

Storage space on both models is further expandable up to 256GB via a microSD card. On the optics front, the smartphone flaunts a dual camera at its back. The vertically arranged rear camera setup comprise of a 13MP primary sensor and a 2MP secondary sensor. The secondary sensor will allow users to take photos with a shallow depth of field so the subject stands out. 

The rear cameras are also accompanied by a LED flash module. As for the front camera, the Honor 7C makes use of an 8MP sensor. Interestingly, the display will act as a soft light source while taking a selfie. In terms of software, the smartphone runs on the latest EMUI 8.0 based on Android 8.0 Oreo OS out of the box. The entire package is powered by a standard 3,000mAh battery which is optimized to provide longer battery life.

Finally, Honor 7C is a dual-SIM smartphone, and it offers connectivity features like Wi-Fi, Bluetooth, 4G, GPS etc.


Blog Archive

How to use Night Mode Browsing in Chrome?

How to use Night Mode Browsing in Chrome? It is therefore advised to run on the night mode in the apps or browsers whenever possible to pro...